Wednesday, May 18, 2011

Crocheted Heart Sucker Covers/Cozies

I needed something to make the kiddos' classes and teachers for Valentine's Day celebration (or as their schools call them "Friendship Parties"). I racked my brain and finally decided to write a pattern a heart pattern. I crocheted 2 hearts and then stitched them together, leaving a large hole in the top so the sucker could slide in and a small hole in the bottom so the stick could come out. I let my 10 year old pick the colors that he wanted out of my yarn stash. I made them out of cheap ole' Red Heart Yarn.

Picture of all of them together:


Maroon/Burgundy:


Purple:


These next 2 are made from the same varigated yarn with totally different looks. Of course we had to have some "MANLY" boy hearts, LOL.


Green, this is my son's favorite color, so we had to make some green hearts, LOL:


And last but not least a close up of the multi colored pink and red. This was the closest I had in my available stash to pink. I have boys and never needed pink cheap yarn, LOL:


I also made plain red and white hearts as well. Red crochet never photographs well for me and I forgot to take pictures of the white, but you can see them in the group shot well enough. They were a hit. I gave some to Speech teachers, Piano teachers and doctors before I took pictures, so I made more than what was pictured. They were pretty well received.

Flower Loom Gift Bows

Well, I had nasal surgery in January. It was pretty minor surgery but I couldn't do anything while I was recovering. I couldn't see well (between the surgery and the meds, my vision blurred), so I couldn't read, look at the computer or watch TV. I couldn't see well enough to crochet or knit, so I needed something pretty easy to do that wouldn't take a whole lot of focusing. I popped in some audiobooks on my MP3 and decided to make some bows from curling ribbon. I have had this in my mind for a while and had been putting off experimenting. Well this seemed like the perfect opportunity to try.

I used a flower loom. Mine has 3 different ringed rows of pegs. It is a Studio Twelve Magni-Fleur loom from the 60's or 70's. I've seen similar flowers made out of some kind of plastic straw, but I couldn't find any easily, locally and I couldn't go shopping for supplies. I've made flowers for gift bags out of yarn before, so now was my chance to try out the idea of using curling ribbon.

Basic supplies
2-5 colors curling ribbon
flower loom
scissors
tape (used to hold the beginning ribbon in place on the back while you wrap)
yarn needle
Double sided tape
optional supplies:
ribbon shredder


I tried different techniques for different looks. Some I simply wrapped, finished off the center:


Some I cut the ribbons after I secured the center, but did nothing else to them:


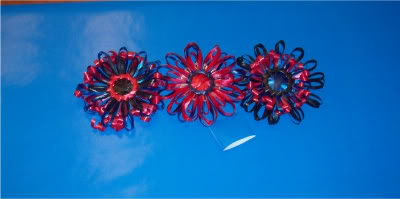
Some I wrapped additional colors around the longest posts, and after securing the centers, I cut the some of the longer loops and used scissors to curl the ribbon:


Some I wrapped the longest pegs, then unwrapped them (I was getting the length of the ribbon I used to wrap the longest set of pegs), used a ribbon shredder to shred the ribbon, the rewrapped the longest pegs. Then wrapped the longest pegs with unshreded ribbon and finished as normal. I left the shredded ribbon in loops but I cut and curled the unshredded ribbon from the longest loops:


Some, I wrapped across 3 of the longest posts. Then wrapped like normal. After is was secured and pulled off the loom, there were really long back loops (the ones wrapped across 3) I cut those in the middle and curled them so that there would be longer curls:


Here are the ones that I did between sleeping and a few other things (I got bored just doing these):


You can see the ribbon I used on the spools in the background, I also took pictures of some other looms that you might be able to make some of these on:


Here is the back of one with the double sided tape on it:


Here is some in use for my son's birthday (I made these in Spiderman colors, LOL):


The thing I like best about these bows, is that they don't get messed up easily like normal gift bows, so you can make a bunch in advance and don't have to worry about them not looking good. They can be stacked and not get smushed and out of shape easily (Unless flattened by something heavy) And they are pretty cheap to make. Those spools of ribbon usually only cost between $2-$3 a piece, so you can just buy the colors you want/need.

I found a really neat site a while back on flower looms, how to use them, what to use on them, etc. http://knitting-and.com/small-looms/index.html

The site has alot of techinques. One thing I didn't see was using curling ribbon with the flower looms. It gives them a different look.

Sweet potatoes

Here are the sweet potatoes we harvest this fall. These were the sweet potatoes that we grew in the cement mixing trays. Only 3 of the 4 varieties produced, so we only actually got 3 trays worth of potatoes. It was still a pretty big harvest considering the size of the trays.

We harvested the white sweet potatoes first:


Baby Shower gift

A friend of mine wanted a baby shower gift for Gavin's pre-K teacher. I made wash clothes out of micro terry and flannel. Then I rolled them up added ribbon to keep them in place and make them look purty :D , added a popscicle stick, wrapped them in celophane and tied them off with ribbons and put them in a small goldfish bowl with a few loose wash clothes in the base. I added some pipe cleaners in matching colors that I had curled around a pencil on one end to shape them for a little added interest. I think they turned out well.

Photobucket

Photobucket

Kids' Christmas handouts 2010

I know, I know, I've been uber slow about posting. I haven't down loaded my camera in a while and before I knew it, months had gone by and I still had stuff to post so here it is.

I made these Snowmen Candy Cane Covers for my sons' classes & teachers for the winter holidays

Photobucket

And of course, I didn't make sure I had a good shot, so this is my only shot of the candy canes. I think I made between 60-70 covers.

Sunday, August 8, 2010

Colin's Steampunk Rocketship Room

Well my oldest son and I got together came up with a theme from his bedroom. He wants a Steampunk Rocketship Ghostbusters Transformers room, LOL. Well, I haven't been able to incorporate all of it, but here is what I have so far. I have not finished. I'll try to get more pictures later.

Here was his room before:

Photobucket

Photobucket

My oldest son's favorite color is green. When we first moved into our new house, I thought for sure that he'd want everything in his room green. But when we were buying curtains for his room he wanted blue and brown. Since the curtains are only a year old, they are staying in his room. He did however pick green as his wall color:

Photobucket

Here you can see that I taped off spaces for the portholes to look out into space.

Photobucket

This was about 3 days into the project.

The next 2 days I painted the frames for the portholes. I added alot of rivets in the frame. It was my first time mural painting with latex paints.

Photobucket

It took another couple of days to paint the space look in the portholes. Unfortunately, I can't seem to get a good picture of the space scenes.

Photobucket

Photobucket

I also painted large rivets in the corners of the room, but I haven't gotten a picture of them. Most of them are going to be covered by furniture, but I wanted them there incase we decided to move the furniture around.

We have had technical difficulties with the furniture however. We decided to paint it all a deep chocolate brown. Well the paint won't cure. We followed the directions, tried repainting, talking to the paint guy representative, etc. So we still haven't gotten his room back together again. Its frustrating to say the least. I gave up on the bookshelves and just went and bought new black shelves. I'll get a picture of them soon enough. We still have to make the desk. He had a cheap particle board desk in his room. But we plan to build a desk using a sewing machine treadle base that I picked up at a garage sale. I just need to design it first.

Anyway, here is a sneak preview of the room finish. Its the lower porthole, on the bottom bunk.

Photobucket

Other additions:
I found some Golden Compass movie toys to display in his room (2 airships and the carriage).
I found a set of book ends at Goodwill that look like books lying on their side. They have secret compartment drawers.
I found a temperature and barometric pressure gauge at a garage sale for his wall. Score!!

I still have alot to go. But its been fun so far.

Wednesday, June 16, 2010

Teacher's gifts - shopping bags

I made a ton of singlet style shopping bags for my sons' teachers, aides, etc. for the end of the year. My oldest only needed 2 but my youngest has so many teachers, aides and others helping him that I just made a bunch and didn't put names on them and asked the teacher to distribute them to whomever helped my son out, that way they could pick what colors they wanted, LOL. I know that's not the way you usually give out gifts, but it worked for us. he got tons of enthusiastic thank you notes. Since it was summer time, I decided to use up some of my summer fabric stash to make these.

Photobucket

Photobucket

Photobucket

I actually pulled out a stack of fabric that had enough to make bags and let my sons pick which fabrics they liked best to make the bags out of. So they had a hand in picking out the gifts

Steampunk pots, the yard & garden

I finally got around to downloading the pictures off my camera. I am very slowly starting to steampunk my house. I decided to use blues, greens & teals in the backyard with some terracotta. I'm going to use black furniture with colored pillows for accents but I haven't bought or made any yet except some folding furniture so all I have is some old faded plastic furniture that is about on its last leg. Anyway here are the pots:

I took plain old plastic pots that were faded and revamped them with plastic paint. I used black, blue and dark green to make these.

Pot #1: I started by spray painting the pot black. I then cut out tentacle stencils out of contact paper and put them on the pot. I then lightly sprayed them with blue and green spray paint to give them a watery look. I sprayed them more solidly towards the bottom of the pot and let it fade into black towards the top. This pot is the biggest of the pots I painted.

Photobucket

Photobucket

Pot #2 - I started out painting this pot black and just spray painted the top with the blue and black and let if fade into the black towards the bottom.

Photobucket

Pot #3 - I started out painting this pot black. I taped off areas and then sprayed blue and green. I then pulled off the tape. I found some upholstery tacks and cut off the shanks. I glued them onto the pot with e-6000 to make the pot look studded.

Photobucket

I have also painted some of them with just the blue and green. I didn't get a picture of them before I got them planted. But here is one of them:

Photobucket

Oh and for giggles, here is the before picture:

Photobucket

I haven't painted all of them yet ( I ran out of good weather and paint), but I did paint over half of them. I haven't decided what else I'm going to do to my yard yet to add a touch of steampunk to it, so I'm open to suggestions. I'm actually thinking of painting images on the fence. I want to add an arbor over the deck out of copper pipe but that might get expensive. Here are some pictures of the backyard so far:

Photobucket

Photobucket

Yes I use unusual containers to make my garden beds. I used an ice bucket tote from Target to make a small water garden for my water lotus plants.

Photobucket

Photobucket

Photobucket

Here's the boys outside toybox. Outside toys are huge.
Photobucket

I'm using cement mixing trays to grow my sweet potatoes, jerusaleum artichokes, taro and water celery. I don't know how well this is going to work but I poked drainage holes where needed, so we will see. I'm hoping to make it easier to harvest the root plants. But some of the plants (the Taro and water celery) like boggy conditions.

Photobucket

Photobucket

Monday, May 17, 2010

Steampunk my house

Well we have been in this house for several months now. This is the first house I've moved into that I have tried to decorate as soon as I moved in. Instead I waited a while until I decided how I wanted to proceed. I'm still lost with the majority but I've decided in the abstract to steampunk my house inside and out. I won't be able to do much with the front of the house, but the backyard is fair game. I'm fascinated with steampunk, neovictorian, gothic victorian, type decorating. I'm planning on Steampunking most of the rooms in my house. I'll try to post my progress, crafts and finds. I plan to even steampunk my kids rooms. My oldest will have more of a spaceship theme and my youngest will have more of a pirateship theme. I'll try to get some pictures posted of the rooms I intend to redo. Atleast so I can have some before and after shots.

For My backyard:
* I'm planning on putting oil/alcohol lamps around the fence. I found some really neat wine bottle oil lamp holders that I've been able to replicate for pretty cheap. I'm hoping to get some blue wine bottles and etch designs into them.
* I've already started repainting some of my cheap plastic pots. They were faded and nasty looking anyway, so it was either repaint them or throw them out. I bought some plastic paints and got to work. I made stencils out of contact paper and painted tentacles on one of them.
* We are also planning (hopefully) to put in an aquaponics system. I think that this will lend itself to an industrial look that I can add some victorian touches to.
* We may build a greenhouse or atleast a covered area to house the aquaponics system.
* I'm 'thinking' about painting some scenes on the wooden fence around the yard to give it some interest.
* We've been buying pots in blues/teals/turquoises to add color to the backyard and give a more nautical color without being cheesy or typical (with navy blue, red and white that you see most nautical themed items in).
* We will be refurbishing a wooden kitchen table to go outside. I may do some woodburning on the top to add a bit of interest.
* Maybe a copper pipe pergola over the deck area that we can attach shade to for the dead of summer.

I'm still working on ideas for the backyard. I may do some of these, or all of these ideas. I haven't worked out anything else for the rest of the house. So as I come up with something, I'll try to post it. I do know I need paint, paint, paint. I'm tired of looking at white and off white walls. We only have one room in the whole house that isn't white or off white and that's a tiny half bath off the laundry room.