Sunday, December 30, 2007

Criss Cross Coaster

I made some coasters yesterday. I found this tutorial on Allsorts' Blog... http://allsorts.typepad.com/allsorts/2006/11/crisscross_coas.html

They are just adorable and pretty easy to make. I made mine out of some hawiian fabric I've had around for a while and some coordinating blue fabric. I made 4 yesterday morning and 4 the night before.

Photobucket

Photobucket

I'm not quite sure what I'm going to do with them yet but I'm really pleased with them. They are probably going to be presents for someone. Or I might just keep a few. I love this Hawiian print. I bought alot of it and I've used some on past projects. And I still have enough to make many more projects with it.

Shopping bags

I found a cute fabric shopping bag tutorial on Craftster.org and decided to try it out myself. The tutorial can be found here:

http://www.craftster.org/forum/index.php?topic=177482.0

Here are my bags:

Photobucket

I used some Debbie Mumm fabric that has been in my fabric stash for a while. I had 5 or 6 different coordinating prints. Unfortunately since I used a Target bag as my pattern, I didn't have enough fabric to make more than one big bag and that bag had 4 different fabrics on it because I could squeeze more than side out of the directional fabric out of a yard. But I did get to make the cute little bag out of the scraps. I had a smaller bag that I got from somewhere and I used it for a pattern. I tried making the pocket on the smaller bag so that it could fold into itself, but I made the pocket too small. Oh well. But the big bag works perfectly. I absolutely love this fabric. Its not something I'm normally drawn to but hey when fabric calls to ya, you better listen, LOL.

Ball Ornaments

I made some ball ornaments for the the tree in the boys room. We "lost" (misplaced) all of the ornaments that normally go on their little white tree. So we had to get and make more. Well since my son's favorite color is green we went with a green and teal theme on their little white tree.

I made these ornaments out of styrofoam balls, fabric scraps, beads, and embroidery floss.

Photobucket

Photobucket

I took a marker and drew on the shapes that I wanted and took a butter knife and traced the lines with the butter knife. I cut out rough shapes to go on the balls out of the fabric in the shapes that I drew on the ball (plus seam allowance). I used the butter knife to shove the fabric into the seams. I threaded some beads on some embroidery floss and with a long needle, I ran that through (just the thread and needle) the styrofoam ball from the top to the bottom of the ball. Make the appropriate hoop at the top and knot at the bottom and your done.

Saturday, December 22, 2007

Snowman Instructions

Photobucket

Body

I used 1 skein of white Red Heart yarn and 1 skein of pearled baby yarn (left over from another project and didn't have the name of the yarn. Sorry). I used a size H hook.

1. Create a magic ring and sc 6 sts into ring. Or ch 2, crochet 2 into the 2nd ch from the hook. (total 6 sc)
2. 2 sc in each sc; repeat until you get 12 sc
3. 2 sc in next sc, 1 sc in next sc; repeat until you get 18 sc
4. 2 sc in next sc, 1 sc in next 2 sc; repeat until you get 24 sc
5-8. 1 sc into each sc.
9. sc2tog, 1 sc into next 2 sc; repeat until you get 18
10. sc2tog, 1 sc into next sc; repeat until you get 12
If using safety eyes, now is the time to place them.
Take time to stuff head now
11. 1 sc into each sc
12. 2 sc in next sc, 1 sc in next sc; repeat until you get 18 sc
13. 2 sc in next sc, 1 sc in next 2 sc; repeat until you get 24 sc
14. 2 sc in next sc, 1 sc in next 3 sc; repeat until you get 30 sc
15. 2 sc in next sc, 1 sc in next 4 sc; repeat until you get 36 sc
16-21. 1 sc into each sc
22. sc2tog, 1 sc into next 4 sc; repeat until you get 30
23. sc2tog, 1 sc into next 3 sc; repeat until you get 24
24. sc2tog, 1 sc into next 2 sc; repeat until you get 18
25. sc2tog, 1 sc into next sc; repeat until you get 12
Take the time now to stuff the body.
26. sc2tog; repeat until you get 6.
Tie off leaving a long piece of yarn. Use yarn needle as pull 6 stitches together, tie off and finish.

Nose

I used 2 skiens of orange embroidery floss together as yarn.

The directions for the nose are approximate, since its up to the creator to determine how long they want the carrot.

1. 4 sc into magic ring
2. 1 sc into each sc
3. 2 sc into 1 sc, 1 sc, 2 sc into 1 sc, 1 sc
4. 1 sc into each sc until carrot is as long as you desire.

After tying off leave a long enough piece so that you can use it to attach to the snow man's head.

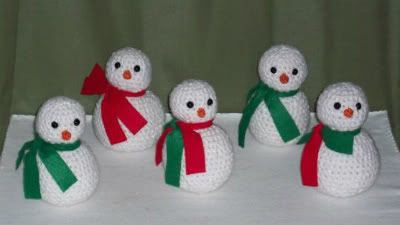
Assessories.... I made a scarf out of 2 pieces of wool/rayon blend felt. One piece was 11 inches and that went around the neck. The other piece was 9 inches and was tied around the first piece of wool. But you could easily crochet or knit a scarf for it. Or you could crochet a top hat or even sew one out of felt. You could also use buttons for eyes or wool felt for that matter. These are very easy to whip up and dress.

Have Fun!!!

Wednesday, December 19, 2007

My son's 7th Birthday party

I had to share what my husband did for our son's birthday party this last weekend.

Photobucket

Can you believe this cake? For those of you not in the know its a Transformers cake and this is Bumblebee's head.

He turns 7 today. Ugh I can't believe it. And he informed me yesterday that he has his first wiggly tooth. They grow up so fast.

Christmas Crafting and Decorating

I know, I know I haven't been very faithful with my blog. But I've been busy I swear!!

Here are some decorations that I've put up this year:

Snowflakes on the windows

Photobucket
I found these snowflakes at 99 cent store last year.

More snowflakes
Photobucket
I made the beaded snowflakes here. I also used some store bought snowflakes. Since I've taken this picture, I've added some clear glass ornaments to the arrangement. They look like bubbles.

Nutcrackers
Photobucket
Every year we try to get a nutcracker for the boys. I like them displayed on top of the TV

Window treatments
Photobucket
Last year I had the snowflakes on these windows. I think I like them better with the balls. This looks much better in person.

My Peppermint Snowman tree
Photobucket
Photobucket
I'm planning to make a head for the top so keep an eye out for further post for my white tree.

Poinsettia
Photobucket
I saw this in a magazine this year and just had to make a few. I love the way they turned out. Sorry I can't remember what magazine. They are just made with pipe cleaners, embroidery floss and beads.

Garland
Photobucket
Okay this is mainly what I've been working on. This was made on a six prong spool knitter. Actually its the Clover wonder knitter that I used. I think it turned out awesome.

Beaded snowflakes
These are just a few I've made for decorations for around the house and the trees.
Photobucket
Photobucket
Photobucket
Photobucket
Photobucket
Photobucket
Photobucket

I made some snowmen for one of my son's teachers to give to her students. She only has 5 students.
Photobucket
I think they turned out awsome.

I made some monster personal tissue holders for my other son's classmates.
Photobucket

Saturday, December 1, 2007

Aliens have landed and they are taking over our trash!!!

I made this cute space ship using those clear containers that come out of gum machines that usually hold junk. Well when we go to HEB, my son gets a buddy buck every week and uses the machine to get stickers for buddy points. Well I haven't been able to throw the containers away, but I didn't know what to do with them. One day I was looking at them and thought they would make the perfect dome for a spaceship. So I used the yarn in the picture, some embroidery floss and a pipe cleaner and came up with this...

Photobucket

Photobucket

Photobucket

And yes that is an itty bitty pompom alien. I think he needs eyes, LOL. I'm thinking of making some more for his Christmas tree, but we will see. Its low on my project list. It might not get made in time for Christmas.