Monday, January 9, 2012

Mom's Christmas gift - Red Dragon Scale Shawl

I started mom's gift back in February. I had been on youtube and saw someone do the crocodile crochet stitch. I thought it was pretty and really lent itself to a shawl. Well a few years ago, mom had asked me to make her a shawl. Better late than never.


I did change the stitch up a bit. I wanted the stitches to look more pointed and less rounded. So I added an additional chain stitch between the 2 sets of 5 double crochets. If you are familiar with the pattern then you probably know what I'm talking about. I just did the stitch until I thought it was long enough. My mom was into WOW and other fantasy stuff so I made her a "Red Dragon Scale" Shawl. The points really do make it look more like scales.

I got on Youtube to look for the crocodile stitch pattern that I saw so I could link it for you guys and found where someone actually put together a video for how to make a shawl using this technique. I haven't watched the whole thing (I only watched the first 5 minutes), but it looks similar to how I did mine:
http://www.youtube.com/watch?v=0LiH9Wk3rHc

This isn't exactly how I made mine, but it looks pretty close.

Emily's Christmas Present 2011

Well since I was blessed with 2 stinky boys and no girls, I got to endulge myself this Christmas and make Emily some dress up clothes. I stared off making some tulle tutus. When I was researching how to make them. I ran across a blog that told you how to cut them quickly and easily. For anyone who has ever worked with tulle, knows that is a welcomed blessing. Tulle is horrible to work with. Here's the website: http://treasuresfortots.blogspot.com/2009/10/cut-tulle-for-tutu-using-quick-and-easy.html

Here's the first one I made:

It was made from the thicker bridal mess, not tulle. I didn't have enough of anyone color to make the tutu so I used all 4 colors (fushia, purple, turquiose and green).

Keeping with the theme of only using what I had on hand, I made a halloween inspired one:

I had just a little bit of black and plenty of the orange.

Black and white:


Maroon and white:


Purple and white, with ribbons:


I made all of these with elastic waists. I went back and forth. I had thought about making them tie on but I figured they would get more play if they were easily pulled on and off.

Well, I put these all in a paper box and had plenty of room so I got to thinking, "What else can I make?" WANDS!!!

So I went to Hobby Lobby and bought dowels and wooden balls that had holes that did not go all of the way through (in other words I didn't want big beads). These were the only supplies I bought for ALL of Emily's gift, everything else was from supplies I already had. I used some star shaped cookie cutters and copied the shapes onto felt and made padded star topped wands. I painted the wood pieces and added ribbon. Here's the result:


One set of barretts. I just couldn't help myself. I wanted to try these out. I might have to make more:


I also made "Boas" out of fun fur and other fuzzy yarn from my stash. They knitted up quickly. the white was actually made on a knitting loom.


And last but not least, I pulled out the 2 alien washclothes from my "to be finished pile" and decided to make Emily a purse. I used some scrap green fabric with white polka dots (from the Dr. Suess outfits I made my boys years ago) to line the purse. I already had the handle knitted as well. I have no idea what I was going to use that piece for. All I had to do was put it all together. Sew the 2 wash clothes together and then the strap on. Sew the cloth together and then sew it to the rest of the purse. I think it turned out cute:

I didn't go so much for "matching" as "make a bunch of cute stuff and fill the box", LOL! I had a BLAST making it all. I had a few more things planned to put in the box, but I made myself stop.

And for giggles, here she is opening it with mommy:

She had to try it on right away so I call that a success.

Gifts for Classmates and Teachers - Winter 2011 edition

Well I did my typical "Should I make something for my kiddos classes or not" that I seem to do every year. I don't know why I do this. I ALWAYS end up making something for them, this year was no different.

For Gavin's class, I just made crayons.


I melted crayons in molds and packaged them up for the kids.

For Colin's class, he and I made page corner book marks. I saw these on pinterest and just had to give them a try. They turned out great. We made 2 for each kiddo. Here they are all packaged up (Sorry we didn't get any close ups):


Here are the directions: http://nheilke.com/blog/?p=2628
We didn't make them monster style. We made the ones that are about halfway down the page.

Now, what to do for the teachers. Well I had a ton of really good ideas that seemed to keep getting waylaid (couldn't find the paint I needed, lost most of my project, etc). So I finally went with a backup... winter themed DISHTOWELS!! I bought a bulk group of washclothes and followed this pattern: http://kleiosbelly.files.wordpress.com/2010/01/hanging-dishtowel-pattern2.pdf I used washclothes instead of cutting a dishtowel in half. I made a TON of these for Colin's one teacher, Gavin's 4 teachers, 4 aides, speech therapist, swim instructor and the boy's piano teacher (I think that was everyone, and everyone got 2). Anyway here they are:


And of course, all of it was done at the last minute.

Mom's Birthday

We were sitting around after Thanksgiving talking when my mother asked me to make her some potholders, hanging kitchen towels, etc. for Christmas. Um, hello, its THANKSGIVING DAY, that's a little short notice. Yes I wanted to scream it, especially since I already had a gift I was making her mostly finished that took me MONTHS to do.

Well I was determined to make these for her, so I got to thinking what I had in my craft room that was unfinished or samples, etc. Well I made a bunch of washcloth sized swatches when I was trying out the Tunisian crochet. SCORE!

I put some borders around 2 of them, added a hanger and a button and you have a dish towel:


Then I took 4 of the wash clothes and made 2 potholders with them. I sewed 2 wash clothes, wrong sides together and added a loop hanger to make the potholders:


Then I had some odd shaped ones that wouldn't make good washclothes, potholders or dishtowels. Well mom has some cast iron skillets so I made some cast iron skillet handle potholders. You just slip the potholder onto the handle and you don't have to worry about burning yourself. I folded these in on themeselves and stitched up the back and across one end. I then took some cotton muslin and some heat resistant fabric and cut them to the same size as the sample. I folded it in half and sewed one end closed then stuffed it into the crocheted piece. I hand sewed the muslin to the crocheted part and came up with these:


I may have to make some of these for myself. I don't have a pattern since I was just clowning around with the samples, I'll have to come up with something.

These were made out of cotton yarn that I bought years ago on clearance. Best of all, I was able to give these to mom for her birthday.

A gift for Lyla

My brother had another baby in October. I wanted to make something for her but didn't know what they needed, so I just made one of the octopus from my own pattern. It turned out well.


I meant to give it to them when I saw them at Thanksgiving, but ended up giving it to them at Christmas. Oh well. They got it all the same.

Tuesday, January 3, 2012

Novel Wreath and other stuff made from recycled books


I ran across this video on youtube and thought I'd give it a try:

http://www.youtube.com/watch?v=8u3cpr8WcmM

I did several things differently though.

1. I wrapped my wreath form (which I got at the dollar store) in book pages. I figured I had plenty and if I didn't quite get the wreath covered in roses, then it wouldn't show.

2. The instructions tell you to make the roses using 3 book pages that are stacked together. I made different kinds of roses (I wanted smaller blossoms). I made some only using one page, some with 2 pages and some with 3 pages stacked.

3. I used regular scissors and fancy edge scissors for some of the cutting when I made the spiral cuts to give it different looks.

4. I used 2 different red ink pads and one silver ink pad to give some of the pages color before I cut the pages into spirals.

5. I used a very thin knitting needle (a skewer would work also) to start the wrapping process. It was just easier for me. I also put a little bit of glue on the paper when I began the spiral so that it stayed in place better. Just be sure you don't glue the paper to your knitting needle.

6. I used 2 different sized pearl beads also.

Here's a close-up:


I also made a small ornament doing the same technique. I just used smaller pieces of paper and I covered a styrofoam ball.


I was having so much fun with the book pages I decided to see what else I could make with them. But I also decided that ink was too expensive for this kind of project, so I decided to use watercolors instead. It went further and didn't cost nearly as much to paint the pages first and let them dry, then cut them or fold them into the shapes I wanted.

First I followed these directions: http://knittygrittythoughts.typepad.com/knitty_gritty_thoughts/2009/11/my-entry.html
but used book pages and hot glue to make this:


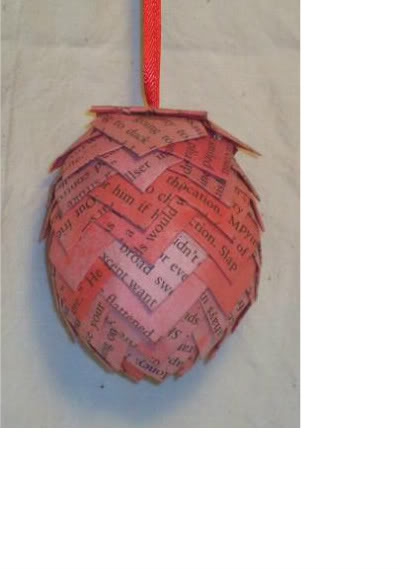
It really looks like an artichoke. I wanted to make one that was more of a pinecone shape so I had some plastic Easter eggs, used the watercolored paper and came up with this:


And for giggles here's an ornament I made using one of the watercolored pages beads and embroider floss:


I can't remember where I found the instructions for this one, but it was easy to make.

I was doing all this when I was supposed to be putting the finishing touches on my Christmas gifts I was making. Hey it was productive procrastination, LOL.

My craft room redo - part 1

I'm redoing my craft room. I painted it and put it mostly back together but I'm not quite finished. But I thought I'd post a picture of my ribbon storage area. I had my husband put 4 screw hooks in the upper windowsill. I then used some chain (the kind you hang light fixtures and such from) and attached it to the hooks I then made slings out of fabric and slid 2 dowel rods through on each side of the sling. At the end of each dowel is 2 eye hooks. I attached the slings to the chains with s hooks. I made 5 slings. I also threaded my curling ribbon on to single dowel rods and hung them below the slings.


These work really well. And I can leave the ribbon hanging over the edge of the slings or have it not show for a cleaner look. I could have just used different sized dowel rods with eye hooks on the ends to store the ribbon, but I didn't want to unstring 20 spools of ribbon when I emptied a spool. I didn't worry about that with the curling ribbon because the spools are bigger and there is ALOT of ribbon on those spools

Monday, October 31, 2011

Halloween

I didn't go all out decorating for Halloween this year. I did the bare minimum. We only took down 3 or 4 totes from the attic. So I didn't really bother taking pictures. I did, however, make some Halloween treat bags for my sons' teachers and aides. One bag for one school/kiddo and 7 for the other.


I used 2 different colored ribbon for most of the bags for a quirky look. My husband made chocolate cake balls and chocolate almond cake balls to put inside. They also contained bookmarks that my sons made for them. My sons (well with my help with the youngest) also made coffin shaped bookmarks for their classmates.

The oldest:


The youngest:


Boy that was a chore. My youngest was tired of doing these after 7. I made him make 21.

Free stuff - yeah!

My husband's boss's wife (snicker) cleaned out her crafting supplies and sent the stuff she didn't want to me. She sent 2 good sized bags of stuff. Here it all is:


There are ribbons, homecoming mum supplies, miniature supplies, some jewelry stuff, batting, etc.

Pillow case dresses

Well I didn't have girls only stinky boys, so I didn't get to make cute frilly stuff for my kiddos. But my brother had a girl (yeah!), so I got to make some pillow case dresses for her 2nd birthday.

I picked up some pillowcases from Goodwill throughout the year.

Here was my first dress:


I had to redo the hem of this pillowcase because it had some weird foldover hem. I realize that kinda defeats the purpose of buying pillowcases to make these dresses (Not having to do the hem), but I didn't know until after I bought the pillowcase. I liked it well enough but I decided to add some embelishments to the rest.

Pink and white flowers with lace:


I added coordinated lace that I already had in my stash to the bottom of this one. After I made this one, I decided to add bias tape to the armholes. It was too much of PITA to fold down the hem for the armholes.

White and green gingham:


I added some buttons and flowers to the bottom of this one and white bias tape around the armholes.

I bought a set of pillowcases for the next 2 dresses, but I embellished them differently for 2 different looks.

Purple with purple polka dots:


I made a purple ruffle out of bias tape for this one and added a bright lime green pattern to it with my sewing machine. I liked how it turned out, but it took FOREVER to do, LOL. I also added purple bias tape to the arm holes.

Green and Purple with polka dots:


I added coordinated lace and bias tape to this one. The colors matched each other better than the picture shows, but it was not a perfect match. I think it looked quirky but cute.

I LOVED making these. Since I have a new niece I hope I get to make more of these soon.